
The shoe molding that goes with hardwood floors is vital, yet frequently ignored, when trying to perfect an installation of hardwood floors. As part of a finish, this trim helps cover the expansion gap that exists between the floor and wall and assists in creating a complete aesthetic look. It serves dual purposes where it hides rough edges and keeps dirt and moisture at bay. You do not have to be a professional to understand why you need to know the purpose, materials, installation, and maintenance of shoe molding. It is important if you want your hardwood floor to remain pristine for a long time.
What is Hardwood Floor Shoe Molding?
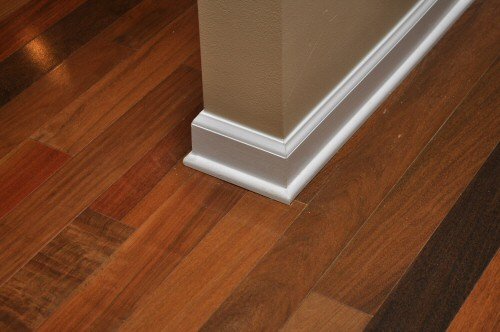
The term ‘shoe molding’ or ‘quarter-round muzzle’ describes a small protruding, curved section of wood that is installed on the wall perpendicular to the floor. To capture and contain the natural movements of hardwood flooring materials due to temperature and humidity changes, it is critical to leave expansion gaps around the perimeter. Because hardwood floors are visually appealing, having a gap around the perimeter is unappealing. As a solution, shoe trim covering the expansion gap with a rounded base offers an effective alternative because it completes the floor aesthetic.
- This trim serves a dual purpose: To hide flaws on the floor’s edge and to provide a transition between the wall and hardwood. It is very useful in high-traffic areas as it reduces damage to the edges of the wooden floors from dust, dirt, and moisture.
Importance of Shoe Molding for Hardwood Floors

There are many important benefits of shoe molding:
- Covers Expansion Gaps: Every wood floor has an expansion gap, an open space for the wood to move with temperature and humidity. Shoe molding not only conceals but also provides an elegant look for this gap.
- Aesthetic Appeal: Renovating a room with shoe molding helps achieve a professional look as it adds final touches to the overall style of the room.
- Protects the Flooring: As a shoe mold serves as the border of the wall and the floor, it reduces the exposure of the wooden edges to dirt, debris, and moisture.
- Easy to Replace: Damaged shoe molding can be replaced very easily without having to redo the entire floor installation.
| Benefit | Description |
|---|---|
| Expansion Gap Coverage | Hides the expansion gap required for wood movement. |
| Aesthetic Appeal | Provides a clean, finished look and complements the overall decor. |
| Protection from Damage | Shields the edges of the hardwood floor from dirt, dust, and water damage. |
| Ease of Replacement | Simple to replace if it becomes damaged or worn over time. |
Other Types of Shoe Molding: Materials and Styles
Different types of shoes come in different forms and designs to match the finishing decor of a room. Below are some of the most popular options:
Materials
- Wood: As the most traditional option, shoe molding wood is usually manufactured using the same species of flooring wood, which ensures a panel and perfect appearance,
- MDF (Medium Density Fiberboard): This is a cheaper alternative that is commonly found in homes with painted or prefinished hardwood floors. It is strong but more susceptible to moisture than wood.
- Vinyl: Perfect for areas prone to condensation, like bathrooms or basements. Such shoe molding is water-resistant and very easy to clean.
- Metal: It is used for modern or industrial style homes. Metal molding can be fabricated for different shapes and designs, displays a modern touch and is very tough.
Styles
- Quarter-Round: The most popular version is characterized by a profile that curves gently into the walls and has a soft, classic look,
- Shoe Trim: A sharper profile style that has fewer curves. Comes in sets in more contemporary and minimal buildings.
- Base Shoe: This is a toned-down and slimmer version of shoe molding that suits minimalistic interiors with spaces needing subtle details.
| Material | Benefits | Best For |
|---|---|---|
| Wood | Durable, classic look | Traditional and natural wood floors |
| MDF | Affordable, easy to paint | Budget-friendly projects |
| Vinyl | Water-resistant, low maintenance | High-moisture areas like bathrooms and basements |
| Metal | Sleek, modern, durable | Industrial or contemporary style spaces |
How to Install Hardwood Floor Shoe Molding: A Step-by-Step Guide
Shoe molding can be installed by people with basic woodworking knowledge, which means that a homeowner with such skills is capable of doing this task. Let me assist you in executing the shoe molding installation:
Materials Needed
- Hardwood floor shoe molding ( determine the style and material)
- Tape measure
- Miter saw, or hand saw.
- Hammer or finishing nails
- Wood glue (if necessary)
- Nail gun (optional for quicker installation)
- Caulk or wood filler (if needed for gaps)
Step-by-Step Installation
- Measure and Cut the Molding: Measure the perimeter of the room to which the molding will be attached. Cut the molding pieces to the appropriate size with a miter saw, making sure to cut straight, accurate lines. If required, set the saw to 45 degrees to make miter cuts at the corners.
- Miter Cut and Assemble Trim: Initially, test that the shoe molding fits correctly by placing it on the perimeter of the floor without attaching it. Then, cut out a corner at an angle so that when the trims are joined, it complements the rest. After that, test and assemble the trim pieces to see if they fit perfectly.
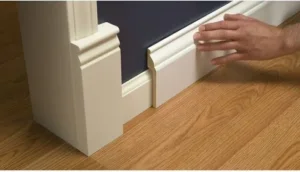
- Apply the Molding: With the help of finishing nails and a hammer, secure it to the wall above the floor. This technique will help the flooring shift underneath. You can also secure it with a nail gun for additional support.
- Caulk Over Nail Holes and Voids: Use wood filler or caulk to cover any visible flaws. Be sure to correctly set the inner molding to the wall and apply it.
- Painting or Staining (If Necessary): Now you can paint or stain the trim according to your decorative needs, in case it was not done before.
Caring for Wooden Floors and Trim Molding
It’s essential to take proper care to keep the shoe molding in perfect condition, ensuring it looks new. Here are some tips that can help extend the life of the trim:
- Consistent Cleaning: Make use of a damp cloth and mild soap for cleaning. Accumulation of dust and dirt can make the shoe molding look dull.
- Avoid using abrasive cleaners: Refrain from using harsh chemicals or abrasive cleaners on your molding. These can damage the finish or paint.
- Repair Scratches: Over time, shoe molding can develop scratches or scuffs. Use a wood touch-up marker or paint to fix minor blemishes.
- Look Out for the Following Molding and Wall Gaps: Gaps between the wall and molding should be checked periodically. If a gap exists, caulk can be used to fill the gap so that dirt does not accumulate in the gap.
Most Common Errors without Out with Shoe Molding Installation
Shoe molding installation is one of the simplest processes to follow. But many people who try it on their end up making needless errors. Here are some ways that can save you from those errors:
- Using the Wrong Type of Molding: The material or style chosen must be in tune with the floor and room décor. Any mismatch will result in a conflicting impression. Ensure that the molding matches your windows and door as well as your hardwood floor.
- Not Measuring Properly: A great majority of people get their pieces cut but actually never bothered to measure it properly beforehand. Always measure your piece before cutting, and remember to cut warrant gaps that must be left.
- Attaching to the Floor Instead of the Wall: Attaching the molding to the floor will limit its movement, so ideally, the molding is attached to the wall before the floor. Remember that shoe molding fittings need to be glued to the wall.
- Overusing Caulk: Messy finishes are a product of overusing caulk, which is good for filling gaps but is too rough around the edges when misused.
- Skipping the Finish: If the wood molding is raw, then finishing it off in paint or stain is a must. Do not forget to add caulk, as it makes the wood look refined and less rough.
Additional Methods of Installing Shoe Molding
Yet shoe molding may have its world of intricacies during its installation due to its simple procedure. These strategies are especially beneficial for those looking for a more professional finish or facing some specific challenges during the shoe molding installation.
Employing a Pneumatic Nail Gun
A pneumatic nail gun is one of the best tools for the installation of shoe molding, provided that the installers possess the right prerequisites and experience. Whenever you are looking for more efficient and quicker installation, especially if you’re working on a single room or a set of different rooms and spaces, you can substitute a hammer for a nail gun like this. A nail gun, unlike a hammer, does not require a makeup of repetitive force. Instead, it uses a blasting mechanism just like the tools used in auto collision repair, alleviating any chances of damage to the wall, trim, or molding.
- Tip: Remember to modify the nail depth as a part of adjusting to avoid driving the nails too deep into the molding. Please make it so the nail heads are resting flush with the wall and do not expose any unsightly dents.
How to Attach Shoe Molding Using a Miter Box
If you find yourself tight on space or don’t have an electric miter saw, you can utilize a miter box to cut precise angles into corner joints. A miter box lets you secure your molding at the exact angle you require while you cut with a hand saw. This is ideal for those who want to do it themselves and don’t have any power tools.
Cutting the Inside Corners
The inside corner edges are usually the hardest part of adding the shoe molding. Here’s how to do it smoothly.
- Find the measure of the angle on the corner. Most corners are 90 degrees, but some can be more or less than that.
- Fix the angle you will be cutting on your molding with a protractor or a corner angle tool.
- For joining purposes, you should cut the pieces at 45-degree angles. Wood glue works well, but make sure the pieces fit well together.
Wood Fillers to Cover Gaps
More often than not, the specific gap that needs to be closed is around the transition between a floor to a wall. Trying to get the shaping accurately can be tough. It is critical to use good quality wood fillers to cover gaps that can be created due to either the natural expansion of wood or slight measurement errors. Sanding the filler lightly will allow for a good finish before painting or staining.
Selecting Appropriate Shoe Molding for Differentiated Hardwood Floors
Shoes allows some creativity in terms of personal preference, and one can get the desired shoe mold. However, the determining factors are the particular hardwood floor file on shoe molding that you have. Follow these steps to find the shoe molding that best fits your floors:
Different Wood Types Integration
It’s preferable to match the shoe molding to the floor wood for oak, cherry, maple, or walnut flooring. This ensures that the boundary between the wall and floor is precise and that the natural grain on the wood is beside the hardwood flooring.
- Oak Floors: Accompanied by oak shoe molding, it is adjustable to oak floors. In case you have an oak floor, pick moldings with warmer tones.
- Cherry Floors: Use cherry wood or dark polished molding to balance with the reddish tones of the floors.
Business Software Unfinished Vs. Finished Shoe Molding
- Prefinished Molding {Shoe Molding}: Announced with Orders of Supplied Structure Part and with Fixing Goes Superior Over Other Types. Cut For Fastening It Does Not Demolish These For People Who Want A Smooth Install Because They Have Do It Yourself principle. Such Hollow Molding Is More Strong Because The Coating Has Been Acquired In The Factory.
- Unfinished shoe molding: Best option if you intend to stain or paint the molding to match the exact hue of your hardwood floor. However, dummy molds require more time and work to complete and polish it ready for use.
Selecting Molding Depending On The Type Of Flooring
- Engineered Hardwood Floors: Such floors have profiles that are usually thinner than normal, so always be cautious of the shoe molding style that may dwarf the space. A thinner molding style (such as a base shoe) works well with engineered floors since it does not overpower the appearance of the floor.
- Solid Hardwood Floors: Solid hardwood floors allow for the use of larger shoe molding. One may also use a more pronounced molding to counterbalance the heaviness of the floor, with the weight of the feature being more trim detail.
Tailoring and Custom Fitting of Shoe Molding to Match Your Home’s Aesthetic Theme
Although some homes prefer the standard version of shoe molding, there is a possibility of tailoring it bespoke for the room’s overall Appeal. Here are a few tips on how to make your molding exotic:
Staining or Adding Paint to Blend With Walls or Trim
One alteration that stands out is staining or painting the shoe molding to either match or stand out from the wall trim or baseboards. For example, if your home has neutral walls, using a contrasting color for your shoe mold will draw attention to it. On the other hand, if you want your room to have a sleek and understated vibe, consider painting your mold to blend in with the wall.
Including Decorative Detailing
You can also make your shoe molders stand out by adding a more elegant touch with intricate carvings and embellishment designs. Purchasing stickers, skins, or carvings can transform your shoe mold into a work of art with a vintage touch. If you have a more classic or vintage-inspired home, detailed carving will bring a touch of class to the mold.
In Combination With Other Molding Types
For a more complete look, consider using other styles of molding in addition to shoe molding, such as crown molding. This works particularly well in larger spaces that have been designed to elevate the eye while simultaneously giving the room more height.
Also Read More: Bathroom faucet doesn’t work after dewinterizing rv
Shoe Molding Trends in 2025: What’s New?
As with most home decor trends, shoe molding has its uniquely evolving trend. Here are some factors to note for 2025 in regard to trends in shoe molding for hardwood floors:
Minimalist Molding Styles
Modernistic and minimalist residential designs have been modernized to adapt more of a simplistic and cleaner look. This has resulted in the adoption of narrower shoe molding with more basic details and contemporary baseboards. These styles provide a sophisticated and uncluttered appearance that can complement simple furniture as well as walls painted in neutral tones.
More Durable Materials
Due to the rise of ecological concerns, expect molding options to utilize sustainable materials like recycled wood and bamboo or MDF alternatives that are now becoming the center of attention to eco-friendly renovations.
Greater, more Versatile Profiles
On the contrary, there has been increasing demand for and interest in bold and larger shoe molding that is common in rooms with high ceilinged spaces and grand spaces. These fittings are more thick and decorative and are intended to add character and richness to the appearance of a room as compared to the ordinary sleek trims.
Integrated Smart Home Features
In the advanced homes of the future, molding will be merged with smart home features such as LED lighting or sensors. Such designs can aid in showcasing the beauty of your floors while serving practical functions like motion-detecting lights in hallways or around doorways.
FAQ: Fixing Your Most Asked 5 Questions on Shoe Molding
What is the difference between quarter-round molding and shoe molding?
Quarter-round molding is larger and has a 90-degree angle, while shoe molding is softer and rounded in profile.
Can I install shoe molding without nails?
Shoe molding can be glued, making nails unnecessary; however, to ensure a secure fit, nails are recommended.
How do I fix gaps in shoe molding?
The gaps can be filled with caulk or wood filler. When dealing with larger gaps, a replacement of the section of molding may be the best option.
Can I paint shoe molding?
Yes, you can paint above-shoe trim molding, especially if it is made out of wood or MDF. Ensure you have paint that matches the trim material.
Do I need to shoe mold with all hardwood floors?
While it is not a requirement, shoe molding does complete the aesthetic and provides added protection to your hardwood floors, particularly in high-traffic areas.
Conclusion
Shoe molding for hardwood floors is an invaluable detail that adds class to the floor while guarding the edges. Whether it is your first time installing molding or you are changing an old one, proper selection of the molding material, quality installation, and good care will make your floors look great for many years to come. By following the steps outlined in this guide and avoiding common problems, you’ll achieve an astonishingly smooth finish every time with minimal effort.
Also Read More: Water smells like rotten eggs only one faucet


