
While upgrading the insulation of their homes, many homeowners wonder if it is possible to blow insulation into the walls. This technique can enhance a home’s energy efficiency without the need for costly renovations. Through the method of blowing, insulation can be added to the walls, minimizing heat loss during winters and preventing heat gain during summers, thus reducing energy costs. But how is this done, and what are the critical aspects of this technique? This article will answer all your questions regarding blowing insulation into preexisting walls and discuss the types of insulation, its pros and cons, as well as the costs involved.
Can you blow insulation into existing walls That Are Already Built?
Indeed, it is possible to blow insulation into walls that are already built. This method is sometimes referred to as retrofit wall insulation or blown-in insulation. It is an ideal method for those who wish to increase the insulation of their walls without the need to take out drywall or disturb the home’s structure. An insulation process known as blown-in insulation aids in withstanding air leaks enables thermal resistance, fulfills soundproofing needs, and involves filling the empty cavities of the walls with an assortment of insulation materials.
What Are The Steps of Blowing-In Insulation Process?
The process of injecting blown insulation into existing walls typically involves the following steps:
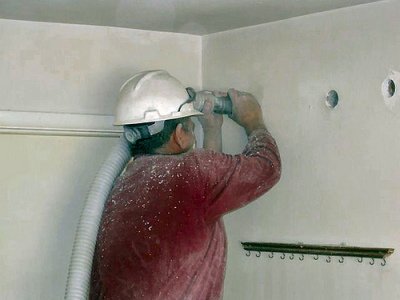
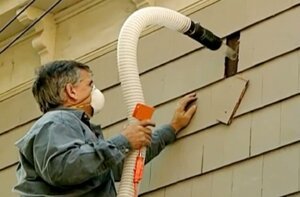
- Drill Holes in the Wall: As for the first step, small holes (usually around 2 to 3 inches in diameter) should be created on the drywall within the studs of the walls. Most of these holes are cut on top of the partition which are hardly seen.
- Inject Insulation Material Into The Wall Cavities: The next stage is applying blowing insulation. With the help of specialized devices, it is introduced through the holes. The material fills all the empty spaces, expanding and settling in place.
- Sealing the Holes: After the insulation work is complete, small holes that may have been opened are filled with small plugs or patches that match the wall color to keep the proper aesthetics of the wall.
- Letting the Insulation Set: Regardless of the type of insulation that is being used, it is expected that the material will immediately set into place and begin the insulating process. Some materials, though, might have other additional setting times for them to be completely effective.
Types of Insulation Used for Blowing Into Existing Walls
There are many options when it comes to choosing insulation material to blow into walls from the outside. Each material will provide certain benefits that vary according to requirement, budget, and climate:
| Type of Insulation | Material | Benefits | Best For |
|---|---|---|---|
| Cellulose | Recycled paper products | Environmentally friendly, good for air barrier, better soundproofing | Older homes, soundproofing needs |
| Fiberglass | Glass fibers | Affordable, non-combustible, widely available | Budget-conscious homeowners |
| Spray Foam | Polyurethane foam | High R-value, excellent air sealant, moisture-resistant | Homes needing high-performance insulation |
- The most popular type of soundproof insulation, cellulose insulation, is produced from recycled materials like paper and is often used in old homes where proper air sealing along with lower energy costs is desired. Therefore, it is treated with a chemical to prevent fire. It also provides superior soundproofing.
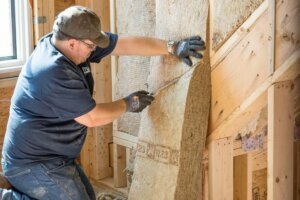
- Fiberglass insulation ranks among the most popular materials for insulation used in residential buildings. This type of insulation is non-combustible and is made of fine glass fibers. Although it does not offer the same air sealing capabilities as Cellulose or spray foam insulation, it is a great option for a cost-effective budget.
- Spray foam insulation is manufactured from polyurethane and outperforms both Cellulose and fiberglass insulation in R-value (thermal resistance). Spray foam insulation is a sealant for air leakage and a barrier for moisture. Hence, it is the best possible choice for homes that require excellent performance.
Advantages and Disadvantages of Blown-In Insulation for Preexisting Structures:
In this section, the primary benefits and drawbacks of blowing insulation into an existing wall structure are discussed:
Advantages
- Energy Efficiency: Insulation that is efficiently and correctly installed minimizes the movement of heat, which makes the house warmer in the winter and cooler in the summer. This can provide a reduction in overall energy costs, of which an average of 10% to 20% is estimated to be saved annually.
- Nonintrusive Installation: The use of blowing insulation into actively existing walls saves the use of new construction work, like installing new solid walls. The procedure for installation is easily completed and requires little regulatory commitment.
- Blown-in insulation, particularly Cellulose, is excellent at soundproofing, making it a great choice if you want to minimize noise between rooms or floors.
Cons
- Higher Initial Cost: Blown-in insulation is more expensive than traditional batt insulation because of the installation equipment and labor costs.
- Settling Over Time: Some materials used for blown-in insulation, specifically Cellulose, will settle over time and lower the overall R-value. Fortunately, this should not cause much of a problem as long as the insulation is done properly.
- Moisture Concerns: The insulation material is susceptible to mold or deterioration when the walls are overly moist or not adequately sealed. This particularly applies to cellulose insulation, which tends to retain moisture.
What Are The Benefits of Blown Insulation into Existing Walls?
In addition, several key benefits make blown-in insulation appealing, especially during a retrofit or upgrade to the existing wall insulation.
Improved energy efficiency translates to significant savings:
Integrating blown insulation into the preexisting walls improves energy utilization, drawing it as a blended benefit. Properly insulated walls enable homes to retain heat during the colder months and cool air during the warmer months. The Department of Energy (DOE) suggests that homeowners can save up to 15% on cooling and heating expenses by retrofitting their walls and the attic.
Older houses often suffer from drastic drafts as well as air leakages which quite dramatically contributes to heat loss. As utility expenses greatly increase and build up over time, blown-in insulation definitely pays for itself.
Nonintrusive and quick installation
Infusing insulation through the walls is a non-invasive procedure that, in comparison to older methods such as extraction of drywall or replacing old batt insulation, is significantly less time-consuming. Apart from the hassle of having to majorly alter your everyday life during the renovations, ensuring easy and proper insulation is much more efficient.
Soundproofing
Blown-in insulation decreases the passage of sound between rooms, floors, or from the exterior. This is extremely beneficial in urban settings or in households that are situated in noisy environments. Cellulose insulation, in particular, is one of the most efficient soundproofers available in the market, making it most suitable for individuals requiring large space acoustics.
Increased Home Value
Improved energy efficiency and insulation can increase the overall value of a house. Prospective buyers will appreciate the energy cost savings and the comfort provided by the walls of a well-insulated house. A property with better insulation is enhanced in value in the real estate market as well as in regions that experience severe weather conditions.
Environmental Benefits
A number of blown-in insulation products, particularly Cellulose, are manufactured out of recycled material. Cellulose insulation, in particular, is one of the most eco-friendly forms available, making it a good choice for homeowners whose activity directly affects global warming.
What is the Charge for Blowing Insulation into Walls of a Building?
For existing walls, blowing insulation has a labor cost that highly depends upon factors such as design, region square footage, location type, and ease of wall approach. The average cost nationwide appears to be circa 1 to 2 USD per square foot, which may vary based on the specifics of the project:
| Factor | Influence on Cost |
|---|---|
| Type of Insulation | Cellulose is typically cheaper than fiberglass or spray foam. |
| Wall Accessibility | Easy access (e.g., open walls or no obstructions) can lower costs. |
| Amount of Insulation Needed | Larger areas or more layers of insulation will increase costs. |
| Labor Costs | Labor costs can vary based on location, difficulty of the job, and company rates. |
Estimated Cost Breakdown
| Insulation Type | Cost per Square Foot |
|---|---|
| Cellulose | $0.90 to $1.50 |
| Fiberglass | $1.00 to $1.50 |
| Spray Foam | $1.50 to $2.00 |
Example Cost: Blowing insulation into the wall of a building on a square plot of a thousand square feet would cost you between $1000 and $2000; the final price is dependent on the preferred insulation along with the labor wages.
Step 6: The Process of Blowing Insulation Into Existing Walls – A Quick Installation Guide
When installing blown insulation into existing walls, you must follow the specific guidelines to ensure proper installation. We will dissect the process below by detailing the steps, the tools that will be needed, the techniques that should be used, and any measures that must be taken in order to attain the best results.
Conducting Preparations and Inspections
In order to start the installation of the insulation, a preliminary inspection helps in determining whether the walls are suitable for insulation. Below is an outline for the necessary preparations:
Wall Condition
Make sure that the walls show no signs of leakage or water damage since these can interfere with the insulation and also foster mold growth. Any leaks should be fixed before proceeding further.
Accessibility
Confirm that all walls can be easily accessed, especially those that may pose a challenge, such as those behind cabinets or fixtures. The installer will have to place insulation using a drill in specific areas on the walls, and therefore, the working space should be free of obstacles.
Step 1: Select Electricity Instillation Material
Identify the insulation type: fiberglass, Cellulose or spray foam based on your requirement. The type of material selected will determine the level of equipment and processes needed for the installation.
Step 2: Making Cavities
In order to insert a blowing machine to insulate the existing walls, it is necessary to make small holes in the drywall every few feet. These holes are usually drilled approximately 2 to 3 feet apart from the wall and apart from each other based on the size of the wall and the size of the equipment. The holes are placed on the top edge of the drywall to ensure that when the insulation is blown, it fills the cavity.
- Diameter of the Holes: These holes have an average length peg of 2-3 inches, which is sufficient to enable the nozzle of the insulation blower to fit freely without any restrictions.
- Location: The holes must be drilled in places that do not have any studs or wires that could get damaged. For this, special equipment is available to the operators. It aids with the location of the studs, electric lines and other plumbing works before making perforations.
Step 3: Blowing Insulation Into Wall Cavity Spaces
The following step involves getting the insulation blown into the wall cavities using a pneumatic blower machine, which allows for loose-fill insulation materials to be blown into the walls through the already drilled holes.
- Filling the Cavities: Blowing walls is executed until the cavity is filled. It is a usual practice for the blower to pressurize the plugging material before inserting it into the wall so that it fills the whole volume evenly.
- Material Control: Every installation worker must take care of the amount of blowing material for every cavity so as not to put additional pressure on the wall structure due to overheating.
Step 4: Hole Sealing
The next step once the cavities are fully insulated, the need is to seal with great precision the holes that were drilled. To do this, plugs or patches that resemble the texture and design of the wall are utilized to ensure that the insulation remains intact afterward.
- Repairing Holes: In order to seal any plaster holes, the plugs are made out of suitable materials such as wood and drywall along with paint, which helps these plugs blend with the surface of the wall. This way, the beauty of the wall, thanks to its aesthetics and structure, cannot be challenged.
Step 5: Post-Installation Inspection
Upon completion of the procedure, the site should be reviewed for proper installation of the insulation. Inspections should also include any gaps, settling, or any areas where the insulation has not been equally distributed. Homeowners may also do a blower door test to identify any air leaks and verify whether the insulation is working as intended.
Most Common Problems and Their Solutions
Blown insulation into existing walls is not very hard to install, but there are problems that homeowners and contractors have to deal with. Given here are some of the most common issues with their solutions.
Moisture and Mold Issues
Blow-in insulation and moisture do not go together because it can reduce the effectiveness of the insulation or, worse, cause mold shredding. Here’s what you can do about it:
- Check for Moisture Leakage: Check for any possible leaks before installation; there should not be any water/seepage/moisture build-up issues within the walls. Water-damaged homes should get a thorough inspection from the installers.
- Moisture Resistant Insulation: If there is a concern of moisture present, then spray foam insulation should be used as it is non-moisture absorbing, unlike other forms of insulation like Cellulose or fiberglass.
Access to Walls is Limited
Due to beams, duct work, electrical wires, or other structural elements, wall cavities may be difficult to access.
- Employ Flexible Tools: Some modern insulation blowers have flexible hoses that can be used to work around obstacles and can be tightened. Working with a qualified professional can ensure that all the spaces in the wall cavity get filled.
- Other Insulation Methods: Rigid foam sheets or spray foam can be used to insulate hard-to-reach areas if insulation cannot be blown into those areas.
Settling of Insulation
The R-value in some cellulose, blown-in insulation types may reduce over time due to settling.
- Overfill the Cavities: To help account for the settling of the insulation material, installers slightly overfill the cavities to ensure that the insulation remains effective.
- Use Higher-R-Value Materials: If you are worried about your insulation’s long-term effectiveness, higher-density fiberglass or spray foam may be best.
Maintenance and Care for Blown-In Insulation
After the application of blown-in insulation is completed, there is necessary very little maintenance, but the insulation should be functioning correctly. Here are a few points to consider.
Look For Evidence Of Damage Caused By Moisture
If your house is susceptible to flooding, it is essential to look for signs of water damage and moisture in the walls. If there is a damp condition within the insulation, it can render the insulation less useful. Particularly, cellulose insulation, is prone to moisture damage.
Always address water leaks in your home as soon as they are detected in order to reduce the chances of moisture adversely affecting the insulation. Additionally, be sure to seal cracks on your walls to ensure against water getting in.
Inspect For Settling After Some Time Passes
With time, a few insulation materials, especially Cellulose, can undergo a small amount of setting, hence needing corroboration. Check on the insulation in the walls once every few years. In case you notice excessive settling, some extra insulation may be used where the material is blown into the cavities.
Conduct Pest Inspections
If the lost insulation is of Cellulose, it can attract different forms of pests; therefore, make sure your house is intact so that animals such as rodents and insects that can hide within the insulation do not get in.
Also Read More: Hardwood floor shoe molding
In Comparison With Other Insulation Types, What Is The Efficiency Of Blown-In Insulation?
Blown-in insulation is not the only method for insulating walls, so it is crucial to analyze its efficiency with other methods.
Blown-in insulation versus Batt insulation
- Efficiency: Compared to insulation made of precut fiberglass or mineral wool rolls, blown-in insulation is more costly. However, blown-in insulation proves more useful in hard-to-reach areas.
- Cost: Blown-in insulation is more efficient at sealing gaps and preventing air leakage than batt insulation, which can leave gaps if not installed properly.
Blown-In vs. Spray Foam Insulation
- R-Value: If you are looking for improved thermal resistance, then spray foam insulation is better than blonde-in due to its greater R-value per inch.
- Air sealing: While both put the air dry into the cavity wall, only spray foam serves as an air sealant. Windows high in the air can also be blowed-in insulated, but only while the rest of the house is tightly sealed. This makes spray foam better for houses that need protection and air sealing but still must reach high places.
Frequently Asked Questions (FAQs) About Blowing Insulation Into Existing Walls
How long does it take to blow insulation into existing walls?
This task usually requires several hours up to a day to finish due to the size of the area to be insulated and the walls’ accessibility. More complicated installations will for sure take longer, as well as larger homes.
Does blown-in insulation settle over time?
Some types of blown-in insulation, such as Cellulose, do settle over time, which may reduce some of its effectiveness. However, this is a gradual process, so if the insulation is done correctly, it should not significantly affect performance in the long run.
Is it possible to install blown-in insulation on walls that have already existing insulation?
You should be able to install blown-in insulation over existing insulation in many instances. This is mostly done in order to increase the R-value of the walls and the energy efficiency.
Is it possible to blow insulation into walls while dry walling is intact?
Yes, it is possible to blow insulation inside the walls without the need to take off the drywall. Insulation is blown through small holes that are drilled into the wall.
What is the R-value of blown-in insulation?
The r-value of blown-in insulation usually depends on the material, but it is frequently between R-3.5 and R-6.5 for every inch of thickness. The higher the R-value, the greater energy efficiency is achieved.
Conclusion
Blowing insulation into preexisting walls is a sensible and effective approach to significantly raise a house’s energy efficiency. Additionally, it helps increase the comfort levels of the home. Appropriate choice of insulation material and the professional services of an installer guarantee that homeowners will enjoy the benefits of well-insulated walls over lower energy expenditures, improved soundproofing, and increased value of the property. Cellulose, fiberglass, and spray foam can all provide long-term benefits when used as blown-in insulation.
Also Read More: Vinyl fence post extension


